Effective use of Nullable
Posted on May 22nd, 2009
In this post I will give a quick usage scenario for using Nullable<T> as well as the nice shortcut of the null coalescing operator ??.
I know when I first ran into some code with this ?? thing in it I was like what the heck is that. Well it is something that every developer should know about. So what does it do? If you are working with objects or value types that can be null you can use this to guarantee that you have a value.
Simple example of how this works:
string test = null;
Console.WriteLine(test ?? "We had a null value");
What this will do is print “We had a null value” to the console. Now in .Net 2.0 they introduced Nullable<T> objects as well. The null coalescing operator can be used with these quite effectively as well.
Let’s look at a Date object and how we used to have to use it:
DateTime today = new DateTime();
if (today.Year == 1900)
{
   today = DateTime.Now;
}
In the old days we would have old date times out there instead of a nice null value. So with .net 2.0 we can now do something like this.
DateTime? today = null;
if (!today.HasValue)
{
   today = DateTime.Now;
}
Now that still looks like a lot of code. This is where the null coalescing operator comes into play. Take a look:
DateTime? today = null;
today = today ?? DateTime.Now;
What this does is allows us to say, hey, if the today variable is null set it to DateTime.Now. It is clean and concise.
Now you may be also asking what the ? is after the DateTime variable. Well this is shorthand for the Nullable<T> object. You could also define the same code like this and it would mean the exact same thing. I just find the ? easier to read.
Nullable<DateTime> today = null;
today = today ?? DateTime.Now;
As you can see not only are nullable objects handy but the null coalescing operator is even handier. So now you might ask can I use it on my own objects. The answer is YES you can use the ?? operator on anything that can be null. This gives this operator true versatility and should be in every developers playbook.
Using Predicate
Posted on May 14th, 2009
Unless you have been living under a rock or unable to use a newer version of .net since 1.1 you have probably run across the Predicate<T> object while using the List<T>. I know lots of people that use these Lists and there are other objects in the framework that use Predicate<t> as well. Another common one would be the Array object. The basic usage of the Predicate<T> object is to provide a delegate with a method that takes as a parameter the same data type of the object in your list. Then the List, Array, or some other object will essentially enumerate over your collection and test each object with this method. Thus the reason it returns a boolean.
What I’m going to show you here is a simple find process that will allow you to create a reusable delegate for use in the Predicate<T> processes using reflection.
First let’s get our pieces in place. Lets first see how to do it inline which is what most people use by default.
First lets define our person class we will use.
class Person
{
   private string _firstName;
   private string _lastName;
   private int _age;

   public Person(string firstName, string lastName, int age)
   {
      this._firstName = firstName;
      this._lastName = lastName;
      this._age = age;
   }

   public string FirstName
   {
      get { return this._firstName; }
      set { this._firstName = value; }
   }

   public string LastName
   {
      get { return this._lastName; }
      set { this._lastName = value; }
   }

   public int Age
   {
       get { return this._age; }
       set { this._age = value; }
   }
}
Next in our main app lets add some data.
List<Person> people = new List<Person>();

people.Add(new Person("John", "Smith", 35));
people.Add(new Person("Caitlin", "Smith", 13));
people.Add(new Person("Steve", "Long", 23));
people.Add(new Person("Justin", "Short", 45));
people.Add(new Person("Karigan", "Patterson", 16));
Now that we have data in our object we want to search. First I will show you the delegate method in-lined.
// Find one result
Person p = people.Find(delegate(Person p1) { if (p1.LastName == "Long") return true; else return false; });
Console.WriteLine("{0}, {1} - {2}", p.LastName, p.FirstName, p.Age);
As you can see we have created a delegate using the delegate keyword and we are passing in a object of the same datatype as our list as a parameter. Since we are doing a simple find operation we are looking for just 1 person with a last name of Long.
This statement is a little long but not too bad in the grand scheme of things. However what if you were writing an application where you had to do a lot of finds based on just 1 property. That in itself would be come very tedious and you would end up with a lot of repetitive code.
So now lets build a class that we can use to help us with this.
public class SimpleFind<T>
{
  private string _property;
  private object _valueToFind;
  private PropertyInfo _p;

  public SimpleFind(string property, object value)
  {
    this._property = property;
    this._valueToFind = value;
    this._p = typeof(T).GetProperty(this._property);
    Protect.Against<nullReferenceException>(p == null, string.Format("Property {0} not found on type {1}", this._property, typeof(T).FullName));
  }

  public bool Find(T t)
  {
    try
    {
      if (this._p.GetValue(t, null).Equals(this._valueToFind))
      {
        return true;
      }
      else
      {
        return false;
      }
    }
    catch
    {
      return false;
    }
  }
}
So let’s go over the class itself. First, you should notice that the class uses Generics in the class definition. The type you specify needs to match the type you use in your list. Next is the constructor. Since the delegate needs to take the type of object that matches your data type we need to pass in the information we need in the constructor. In this case since we are trying to find data based on a property value we specify the Property Name that we are going to search against and the Value we want to search for. Now the find method does all the real work though. In the find method you see we are getting the property via reflection and making sure that we actually have that property before we use it. The Protect object was discussed here. Other than that you will notice that the code pretty much matches what we did earlier.
Now to see the difference:
// Find one result
Person p = people.Find(new SimpleFind<Person>("LastName", "Long").Find);
Console.WriteLine("{0}, {1} - {2}", p.LastName, p.FirstName, p.Age);
As you can see it’s a bit shorter and highly reusable. So what if you wanted to find more than one record. The same class can be used again.
// Find one result
List<Person> p2 = people.FindAll(new SimpleFind<Person>("LastName", "Smith").Find);
Console.WriteLine(p2.Count.ToString());
Well that’s it. It’s a pretty straight forward process. However I find it very useful and easy to use and the nice thing about it is that since it’s an object you could re-use it with just a little bit of tweaking.
Enjoy.
*** UPDATE ***
After doing some more testing with this class I found that I needed to move the Property Info object up into the constructor to improve performance and reduce overhead. As well I moved the protect statement to the constructor as well as any error was causing the system to just return false and keep trying to process the find. It should stop. Last but not least the If condition in the find method was changed to just use the .Equals method.
Introduction to the Circuit Breaker pattern
Posted on March 6th, 2008
Download the code (14kb)
I was reading the book Release It! about a month ago and ran across this pattern for creating code that has the ability to essentially shut itself off. It just so happens that I had a use for this type of process and it helped me to create my final design. What I was working on was a component that used a third party webservice for batch processing. In this batch we would send over anywhere from 50-1500 web request one right after the other. As such if we had any problems on the service end we could have thrown 1500 or even more error messages depending on how it was coded. Of course we did not want that as it could potentially cause even worse problems by letting our app continue to try and process our data even if the service was down. So instead of needlessly killing each of our apps I took a queue from the book and implemented the circuit breaker pattern.
Now you might ask what is the circuit breaker pattern? Well lets take a look at a real world scenario that everybody is familiar with. Every home today has a main power box that is the central point at which power enters the home. Now depending on how old the home is you could either have circuit breakers, fuses, or even worse a piece of metal jammed between the connections (I’d hope not). Now fuses and circuit breakers all work the same way and for the same reason, to regulate the amount of load that is allowed over the electrical wire. This is important because if there were no limit then it would cause an electrical short somewhere and possibly a fire. It happened a lot before the fuse was created. So, the use of a fuse or circuit breaker is meant to make sure we don’t put too much of a load on the circuit or wire. Once a threshold is met then the circuit is tripped or the fuse is blown. Thus stopping the flow of power. Now if we look at our code base we want the same thing to occur. So if I were to start sending records to the service in question and they start constantly failing as long as we have setup a threshold for error counts or failures we can then trip our circuit so to say and stop the flow of data to this service.
Well you might ask how can we do this? In our code bases is really not all that difficult to implement once you get the concept down. So let’s look at some code to create a small example application. Now you don’t have to create an interface but I wanted to really show what you need to do to add this functionality to your existing code.
public interface ICircuitBreaker
{
    void BreakCircuit();
    void ResetCircuit();
    bool CircuitBroken { get; set; }
    int Threshold { get; set; }
}
Next I’m going to embed an entire class with the interface implemented. To show how this works I have created a class that writes to a file. If there is a problem writing to the file for a specified number of tries then it will fail gracefully vs throwing an exception.
public class FileWriterWithCB : ICircuitBreaker
  {
    private bool _circuitBroken;
    private int _threshold;
    private string _fileName;
    private int _batchSize;

    public FileWriterWithCB()
    {
      this._circuitBroken = false;
      this._threshold = 5;
      this._fileName = "CBTest.txt";
      this._batchSize = 50;
    }

    public string FileName
    {
      get { return this._fileName; }
    }

    public int BatchSize
    {
      get { return this._batchSize; }
      set { this._batchSize = value; }
    }

    public void WriteToFile()
    {
      FileStream fs = new FileStream(this._fileName, FileMode.Open, FileAccess.ReadWrite);

      StreamWriter sw = new StreamWriter(fs);

      string data = "This is a test file write";

      sw.Write(data);

      sw.Flush();
      sw.Close();
      fs.Flush();
      fs.Close();

      sw = null;
      fs = null;
    }

    public void RunBatchWithCircuitBreaker()
    {
      int failureCount = 1;

      for (int x = 0; x <= this._batchSize; x++)
      {
        if (failureCount > this._threshold)
        {
          Console.WriteLine("Threshold reached breaking circuit.");
          this.BreakCircuit();
        }
        if (this.CircuitBroken)
        {
          Console.WriteLine("Circuit is Broken exiting code loop.");
          return;
        }

        try
        {
          // This should throw a FileNotFound Exception
          this.WriteToFile();
        }
        catch (Exception ex)
        {
          failureCount++;
          // Just write to the console to show that it is throwing the errors.
          Console.WriteLine(ex.Message);
        }

      }

    }

    #region ICircuitBreaker Members

    public void BreakCircuit()
    {
      Console.WriteLine("Circuit is being broken.");
      this._circuitBroken = true;
    }

    public void ResetCircuit()
    {
      Console.WriteLine("Circuit is being reset.");
      this._circuitBroken = false;
    }

    public bool CircuitBroken
    {
      get
      {
        return this._circuitBroken;
      }
      set
      {
        this._circuitBroken = value;
      }
    }

    public int Threshold
    {
      get
      {
        return this._threshold;
      }
      set
      {
        this._threshold = value;
      }
    }

    #endregion
  }
Ok, so let’s look at what this is doing. First the class is used to write to a file. There are two methods to write to the file. One is a single write only the other is a batch writer for us to show the use of the circuit breaker pattern. By default we set the system to perform 50 writes and the threshold is 5 errors, at which point we would expect the circuit to be proverbial broken. In the attached code you will find a unit test that you can run to see the results for yourself. Needless to say when you run the codebase you should see that there are five errors thrown at which point the codebase effectively shuts down. Try playing with the threshold.
Overall the pattern shown here can be very effective in integration scenarios but it’s especially effective in batch processes. In the integration scenario you could have your app try to connect to say an external service and if it fails you want it to return a specified value vs crashing or throwing an exception. This can be easily accomplished by adjusting how you use the circuit breaker. All you would need to do is set your boolean variable if your external service is down.
Book Review: Release It!: Design and Deploy Production-Ready Software
Posted on January 17th, 2008
After reading on several blogs that this was a book worth getting I decided to get myself a copy. I will say that this is a great book and that it should be on every programmer’s bookshelf. This is right up there with Code Complete. If you have not already gotten a copy you should do so.
When it comes to technical books I like to only purchase books that I will continue to use over the years vs ones that are very targeted and will go out of date. Thus architectural books are a prime candidate for purchase. However knowing which to buy can be daunting. After all who wants to plop down $50 or more for a book that might only have 1 or 2 good chapters in it or is a rehash of books you already have. That’s where these reviews come in. I picked up this book based on reviews on other blogs and I was not disappointed. While the information in the book is presented by an obvious Java programmer it in no ways is tied to Java programming. It provides insight into several projects from the real world and things that they learned from them. As such it is more of a best practices book vs a code book. From Anti-Patterns to Patterns it walks you through various scenarios and things to watch out for when developing release ready software.
After reading the book myself I was able to make changes to the way I was coding my components to take advantage of these patterns. By making use of this pattern I was able to take a service interface layer and change it such that the application using it would not crash from this component as it had done in the past. I was able to accomplish this by using the circuit breaker pattern that he describes in his book. Basically what it does is very much what you would expect. Just like in a home if you plug too many items into your outlet and it overloads the circuit it throws the breaker so you don’t burn your house down. So in code what this does it allows you to implement your code such that if you run into problems it can shut down the interface or process without taking down your application with it. After all who wants to crash their application or website because an integration point is down or broken.
There are quite a few other patterns some of which I have already taken advantage of like the Fail Fast pattern. I can honestly say that after reading this book almost any developer should be able to walk away a better programmer and will most likely start to use some of the patterns presented in this book. I know I have.
All in all this was an excellent book and it was written very well and not all that expensive. If you would like to see a more in-depth review see this blog post, Ayende’s Blog.
This book should be on every developer’s bookshelf. Get it now. You can get it here: 
Tutorial – Google Desktop Sidebar – Hello World Part 4, Loading and Saving our properties
Posted on December 10th, 2006
Requirements
.Net Framework SDK 1.1
Google Desktop SDK
Downloads
The zip file listed here is all inclusive of all four tutorial parts. We broke up the article into four parts for ease of reading. Included in the zip is a Word doc version of all four articles.
Download (231KB)
Purpose
In this article I intend to show you how to extend our simple Google Desktop Sidebar (GDS) component. All the source is in C# 1.1. We assume that all developers looking at this article are familiar with writing code in C# and the .Net framework. For this component we will be doing a simple Hello World type sample. We will show screenshots where appropriate. Otherwise we assume you know your way around.
What it Shows
In this part of our tutorial we will be showing you how to save and load the changes you have made. We do not take it so far as to keep up with the content but it gives you the general idea.
Storing our changes
Ok, as we all know if you make a change to something and you want it to stick we must save it. Well the GDK provides that functionality as well. In order to provide this save / load functionality we must implement the interface IPersistStreamInit. To start with we need to add some basic data to our class. We are going to add the following member variables.
const int dataVersion = 1;
private bool isDirty;
The dataVersion property can probably be replaced to read from your assemblyInfo.cs file but we will leave that to you. We need this property so we can support versioning of our component. It will also help if you happen to have multiple versions running that you get the correct data loaded for your component. You don’t really need this but it does provide a bit of added support for later. The isDirty flag will be set and used so we know when anything has changed so that we know when to save our data.
So, for us to know that something has changed we need to add it to our layout property. Let’s change our code:
public GoogleDesktopDisplayContentItemLayout Layout
{
  get { return this.layout; }
  set { this.layout = value; this.isDirty = true; }
}
All we have done here is add the isDirty flag to our property. Now we also need to initialize it so let’s add some code to our constructor.
this.isDirty = false;
Now we can start looking into the IPersistStreamInit interface. The first thing you will probably notice is that it has an IsDirty property. This is used by the GDK to determine if the Save operation needs to occur. So lets modify the code, note that we need to change a Boolean value into an unsigned integer.
public UInt32 IsDirty()
{
  return (UInt32)(isDirty ? 1 : 0);
}
Now that we can tell if our component needs to be saved letss add the code to save our changes. We will do this by adding code to the Save method.
public void Save(UCOMIStream stm, bool clearDirty)
{
  MemoryStream memStream = new MemoryStream();
  BinaryWriter binWriter = new BinaryWriter(memStream);
  // first our version
  binWriter.Write(dataVersion);
  // then the data.
  binWriter.Write(this.Layout.ToString());
  // cleanup binWriter.Flush();
  // write to actual output stream
  byte[] data = memStream.ToArray();
  stm.Write(data, data.Length, IntPtr.Zero);
  if (clearDirty) isDirty = false;
}
Now again, we assume you know how to use the framework and that includes the IO process. So, what we are doing is setting up a memory stream since the GDK actually handles the file IO. To Write to the stream you should be able to use any type of writer and pass it the memory stream to write to. The first thing we write out is our dataVersion and then we write out the value of our Layout property. You will notice that we are writing the string value representation, this will make it easier to pull back in later. Once we are done we convert the memory stream into an array of bytes so we can pass it to the underlying COM stream that the GDK has provided to us. Last but not least we set the dirty flag only if the stream write was successful.
Once we have saved our data we can now add code to load our data. This works the same way just in reverse. In a more advanced scenario there is no reason why you could not serialize / de-serialize a class into this stream. Let’s add our Load code.
public void Load(UCOMIStream stm)
{
  const int maxDataLen = 1000;
  // read a large enough number of bytes for us.
  byte[] data = new byte[maxDataLen];
  stm.Read(data, data.Length, IntPtr.Zero);
  MemoryStream memStream = new MemoryStream(data);
  BinaryReader binReader = new BinaryReader(memStream);

  int version = binReader.ReadInt32();
  if (version != dataVersion)
  {
    MessageBox.Show("Invalid data version, using default values");
  }
  else
  {
    string value = binReader.ReadString();
    switch (value)
    {
      case "GDD_CONTENT_ITEM_LAYOUT_NEWS":
        this.Layout = GoogleDesktopDisplayContentItemLayout.GDD_CONTENT_ITEM_LAYOUT_NEWS;
        break;
      case "GDD_CONTENT_ITEM_LAYOUT_EMAIL":
        this.Layout = GoogleDesktopDisplayContentItemLayout.GDD_CONTENT_ITEM_LAYOUT_EMAIL;
        break;
      case "GDD_CONTENT_ITEM_LAYOUT_NOWRAP_ITEMS":
        this.Layout = GoogleDesktopDisplayContentItemLayout.GDD_CONTENT_ITEM_LAYOUT_NOWRAP_ITEMS;
        break;
    }
  }
}
In this section of code we are again creating a Memory stream and this time a Reader object. You should create the same type of Reader as you did writer so that it will be compatible. Seeing as how we have only written a small amount we have set an arbitrary size of 1000 bytes to read which is way more than enough to cover getting our info. If you had a large set of data you would need to get the actual size of your data and initialize accordingly. Since we wrote out the first value of our dataVersion we can check it first to make sure we are working with the same file. If we are then we can read the rest of the data and set our Layout property to what we saved the component with last.
Well that should do it so compile your app and you should get the following prompt.

If you don’t fix any problems you have and then try again. You are ready to try it out. So open your GDS and then go into the properties and change the value and then exit the GDS and re-open your data should be displayed the same as when you exited the app.
The first time you run your app you will get an error saying that you have an invalid data version. We could wrap this but we will leave this to you the reader as an exercise.
What you have learned
In this last part of our tutorial set you have learned how to load and save your data changes that you make to your plug-in. If you want to make it more extensive we will leave that to you the reader as an exercise.
Conclusion
We hope that you have found these tutorials helpful. In looking through the developer forum we saw that a lot of people had asked for one and hope this meets the needs of what you were looking for.
Enjoy.
Tutorial – Google Desktop Sidebar – Hello World Part 3, Adding a Property Page
Posted on December 10th, 2006
Requirements
.Net Framework SDK 1.1
Google Desktop SDK
Downloads
The zip file listed here is all inclusive of all four tutorial parts. We broke up the article into four parts for ease of reading. Included in the zip is a Word doc version of all four articles.
Download (231KB)
Purpose
In this article I intend to show you how to extend our simple Google Desktop Sidebar (GDS) component. All the source is in C# 1.1. We assume that all developers looking at this article are familiar with writing code in C# and the .Net framework. For this component we will be doing a simple Hello World type sample. We will show screenshots where appropriate. Otherwise we assume you know your way around.
What it shows
In this part of our tutorial we will be adding a property page to our component that will allow us to change the content format among the three built-in types.
Adding Property Pages
We are assuming you have kept up so far if not pull down the code from above and you can follow along or you can work through the other two parts.
Since we are going to add a property page lets start with the obvious. Add a new Windows Form file to your project. Once complete open up the code window and add the following Using statements.
using System;
using System.Drawing;
using System.Collections;
using System.ComponentModel;
using System.Windows.Forms;
using System.Runtime.InteropServices;
using Google.Base;
using Google.Base.Utils;
using GoogleDesktopAPILib; // Google Type libraries
using GoogleDesktopDisplayLib; // Google Type libraries
As you can see it is mostly the same as a windows form but we have added the google items to the mix. If you look in the GoogleBase folder you will see a base property page object. This is taken pretty much straight from the samples that google provided. What you want to do is change your form class to inherit from the base property page class. That will hookup the form so it can be used by our plug-in. Your class should look something like this:
[GuidAttribute("DFAEFC1E-2466-40d5-80D6-3FF5136627DA")] // CHANGE THIS in your plug-in
[ClassInterface(ClassInterfaceType.None)]
public class frmHelloProperties : Google.Base.PropertyPage
Notice that again just like our main plug-in class we have a GUID Attribute. Since the plug-in / GDS needs a handle to the property page we need the GUID so that COM can get a hook into it for our use. Next by marking our class with the ClassInterface attribute we can control whether or not the class is exposed via a typelib. Since this is used internally we can mark it as none.
Now once you get that done you can setup your form however you want. Just like a normal form. For this tutorial we are going to add a label and a combo box. So add them to the form and change the Label to say “Change Display Layout”. Then change your combobox to be a drop-down list. Next add the following values to the Items collection, NoWrap, Email, and News.
Next let’s get back to our code. We are going to override two methods on our property page, OnPageActivate and OnPageApply. As there names imply we will be handling code when you open the property page and when you hit the Apply or OK button.
Let’s do the Activate method first.
/// <summary>
/// Called just before the property page is displayed
/// </summary>
protected override void OnPageActivate(System.IntPtr wndParent, Rectangle Rect, bool modal)
{
  base.OnPageActivate(wndParent, Rect, modal);
  HelloWorldPlugin ctl = dataObject as HelloWorldPlugin;
  if (ctl != null)
  {
    // Get the parameter values from the plug-in
    switch (ctl.Layout)
    {
      case GoogleDesktopDisplayContentItemLayout.GDD_CONTENT_ITEM_LAYOUT_EMAIL:
         this.cboLayout.SelectedItem = "Email";
         break;
      case GoogleDesktopDisplayContentItemLayout.GDD_CONTENT_ITEM_LAYOUT_NEWS:
         this.cboLayout.SelectedItem = "News";
         break;
      case GoogleDesktopDisplayContentItemLayout.GDD_CONTENT_ITEM_LAYOUT_NOWRAP_ITEMS:
         this.cboLayout.SelectedItem = "NoWrap";
         break;
    }
  }
}
The first thing we do is let the base class do what it needs to do, then we apply our content information / changes. Each property page has a dataObject that equates to the plug-in you are using. So we need to set and cast our object to the type of our plug-in. If we have a plug-in handle then we can continue with our code. The property we have here, which we will create in just a few, is called Layout. It is of the type GoogleDesktopDisplayContentItemLayout which defines the three currently supported display formats out of the box. So what we do here is figure out what we are currently using and then set our combobox to the appropriate value.
Next lets look at the Apply process which is very similar.
/// <summary>
/// Called when user hits OK in the property page
/// </summary>
protected override void OnPageApply()
{
  HelloWorldPlugin ctl = dataObject as HelloWorldPlugin;
  if (ctl != null)
  {
    // Set the new parameter values back to the plug-in
    switch (this.cboLayout.SelectedItem.ToString())
    {
      case "NoWrap":
        ctl.Layout = GoogleDesktopDisplayContentItemLayout.GDD_CONTENT_ITEM_LAYOUT_NOWRAP_ITEMS;
        break;
      case "Email":
        ctl.Layout = GoogleDesktopDisplayContentItemLayout.GDD_CONTENT_ITEM_LAYOUT_EMAIL;
        break;
      case "News":
        ctl.Layout = GoogleDesktopDisplayContentItemLayout.GDD_CONTENT_ITEM_LAYOUT_NEWS;
        break;
    }
    ctl.GetOurStuff();
  }
  base.OnPageApply();
}
Again we get a handle to our plug-in object. However this time we do our setting of our data. Now you will also notice that we are making a direct call to the GetOurStuff method. This way we can go through and re-apply our formatting to our content items. Last but not least we call our base method so that the GDK can finish anything else it needs to.
Since we defined the layout variable in part two you should be able to just add this class. Next lets go through and hookup the property pages. To do this we need to implement the ISpecifyPropertyPages interface. It’s pretty simple and straight forward so here is the code:
public void GetPages(ref CAUUID pages)
{
  // get our guid
  Guid[] g = new Guid[1];
  g[0] = typeof(frmHelloProperties).GUID;
  pages.SetPages(g);
}
What we are doing here is getting the GUID from our property page and then setting it into the pages object provided by the GDK. It will then get the hook to the property page and display it.
Let’s go ahead and compile it and see what we have so far. When you compile your code you should hopefully get the following dialog. 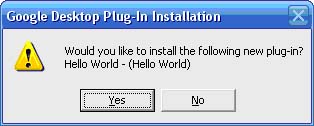
If you did not fix any errors you have and then continue. Next if you do not have the GDS running start it up.
To start you should see something like the following: 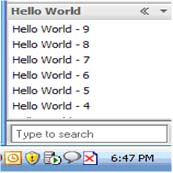
Now let’s open the property page by selecting the down arrow and choosing Options. As you will see it will show the NoWrap as the current display style. This is what we set in the constructor of our main plug-in code. Try changing it around and see how it looks.
Email View 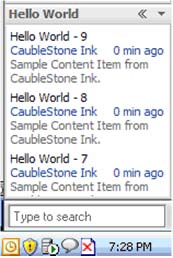
News View 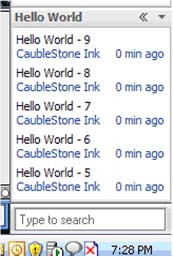
What you have learned
In this part of our tutorial you have learned how to add a property page and how to apply those changes to your plug-in. In our next part of this tutorial we will show you how to save your view layout information and restore it at run-time.
Tutorial – Google Desktop Sidebar – Hello World Part 2, A simple plug-in with Content
Posted on December 10th, 2006
Requirements
.Net Framework SDK 1.1
Google Desktop SDK
Downloads
The zip file listed here is all inclusive of all four tutorial parts. We broke up the article into four parts for ease of reading. Included in the zip is a Word doc version of all four articles.
Download (231KB)
Purpose
In this article I intend to show you how to extend our simple Google Desktop Sidebar (GDS) component. All the source is in C# 1.1. We assume that all developers looking at this article are familiar with writing code in C# and the .Net framework. For this component we will be doing a simple Hello World type sample. We will show screenshots where appropriate. Otherwise we assume you know your way around.
What it Shows
In this part of our tutorial we will be showing you how to add content items to your basic plug-in. It is assumed that you have the code from the previous article as we will be building from that base. So have it ready.
Adding Content
As stated we are now going to look at what it takes to add content items to our GDS plug-in. We are going to take the simple approach and just build a for loop that will add 10 items to the plug-in every time it’s loaded. That’s it.
So let’s get started. First add a new class file to your project from earlier and add the following using statements:
using System;
using System.Text;
using System.Windows.Forms;
using Google.Base;
// Base module to ease plug-in development
using Google.Base.Utils;
// Base module to ease plug-in development
using GoogleDesktopAPILib;
// Google Type libraries
using GoogleDesktopDisplayLib;
// Google Type libraries
As you will see this is very similar to what we had in our earlier tutorial. Now let’s add our class definition. If you want to change the class name go ahead.
public class HellowWorldCI : GoogleDesktopDisplayContentItemHelperClass, IGoogleDesktopDisplayContentItemHandler
Since this class is not created directly you do not need a GUID attribute on it. As you can see we are inheriting directly from the Helper class provided by the GDK and an Interface. Make sure you use the Class viewer to implement the interface for it.
Most everything you can pretty much leave alone. We will only show you the actual methods that we will be changing from the default implementation. As per the documentation you should throw the NotImplementedException when ever you do not implement a particular method. By doing this the underlying api will know to use the default method for handling this as per the application framework.
A lot of this block of code is taken from the samples that come with the GDK only we have cleaned it up a little bit and by breaking it into a separate file we feel that it makes it easier to understand and conceptualize what is going on.
Add the following code to the ProcessDetailsViewFeedback method:
if ((flags & GoogleDesktopDisplayDetailsViewFlags.GDD_DETAILS_VIEW_FLAG_TOOLBAR_OPEN) != 0)
{
   OpenItem();
   return;
}
if ((flags & GoogleDesktopDisplayDetailsViewFlags.GDD_DETAILS_VIEW_FLAG_NEGATIVE_FEEDBACK) != 0)
{
  MessageBox.Show("Not interesting: " + heading + "Doing default processing");
}
// throw this exception to let the default processing happen for all other
// details view commands
throw new NotImplementedException();
The OpenItem method will be defined in just a few minutes. All it will do is popup a message box. What this code does is when you are in the detail view for an item there are several processing options. You can click on the header, the Remove item, or the X in the right hand corner. By clicking on each different element you can have it do several things. In the case of an RSS feed if you click on the title it will normally take you to the web article in your current browser. If you click on the Remove Item it normally tells the interface to delete it, etc. By handling the information in this section you can have your code execute various actions depending on how you interact with it.
Next for the OnDetailsView method add the following code:
// Here we can create any ActiveX control for displaying the details, and
// return it via the detailsControl parameter. We choose the
// 'GoogleDesktopDisplayDetailsViewHelper' control that will give us a
// UI that's inline with how the sidebar looks.
GoogleDesktopDisplayDetailsViewHelperClass details = new GoogleDesktopDisplayDetailsViewHelperClass();
// set the details control's content from our own data
string text = "Hello World... How are you/r/n/r/nSome sample text/r/n/r/nwithout formatting/r/n";  details.SetContent(source, time_created, text, false, layout);
detailsControl = details;
title = heading;
flags =  GoogleDesktopDisplayDetailsViewFlags.GDD_DETAILS_VIEW_FLAG_TOOLBAR_OPEN | GoogleDesktopDisplayDetailsViewFlags.GDD_DETAILS_VIEW_FLAG_NEGATIVE_FEEDBACK;
return false;
// return false to show details view, true to cancel it.
This block of code is executed when you click on an item and it goes to open the expanded details view for an article. The base class used here as seen is the GoogleDesktopDisplayDetailsViewHelper class. This is the base class used by the API to display the standard details view. If you want to implement your own you would need to write the appropriate ActiveX control to handle this. What we are doing I this class in our case is setting the internal details for each item when opened into details view. This is not good for dynamic content but for this example it works perfect. The SetContent method will take the values of the object in question and use it for rendering the object.
Add this code for the OpenItem method:
MessageBox.Show("Open: " + this.heading);
All are doing here is that when you double click on the item it will display the heading for the item that you double-clicked on.
That pretty much does it for this class. Now we need to update the main plug-in class from Part 1. First we need to add a property to our class to handle the Layout of our content. This will play a bigger part in the later tutorials. For now let’s add this code.
public GoogleDesktopDisplayContentItemLayout Layout
{
  get { return this.layout; }
  set { this.layout = value; }
}
On our main plug-in class lets add the following method:
public void GetOurStuff()
{
  // clear our stuff out first this.
  RemoveAllContentItems();
  // setup the basic display options needed to add to object.
  GoogleDesktopContentItemDisplayOptions options =        GoogleDesktopContentItemDisplayOptions.GDD_ITEM_DISPLAY_IN_SIDEBAR |        GoogleDesktopContentItemDisplayOptions.GDD_ITEM_DISPLAY_AS_NOTIFICATION_IF_SIDEBAR_HIDDEN;
  // We are going to add 10 hello world items.

  for (int x=0; x<=9; x++)
  {
    GDP_HelloWorld.HellowWorldCI content = new HellowWorldCI();
    content.heading = "Hello World - " + x.ToString();
    content.source = "CaubleStone Ink";
    content.snippet = "Sample Content Item from CaubleStone Ink.";
    content.time_created = DateTime.UtcNow;
    content.flags = GoogleDesktopDisplayContentItemFlags.GDD_CONTENT_ITEM_FLAG_NONE;
    content.layout = this.Layout;
    this.AddContentItem(content, options);
  }
}
The first thing for this method is that we will remove all the existing items from the plug-in. Essentially clear all. In the real-world this should be dynamic but for this tutorial it allows us to recreate all the items easily. Next we set our base options in this case we tell the item that it will be displayed in the Sidebar and that if the Sidebar is set to auto-hide you will get a toast notification of the change. After that we will be adding our content. We setup the loop to add 10 items to our content page. To do that create an instance of our content class that we created earlier. Then set the heading, source, snippet, etc. For the time use the UtcNow otherwise it will not calculate the added time correctly. We have also setup a property on our main class called Layout that will retrieve our base layout. If you look at Part 1 you will see that by default it is set to the No Wrap option. This will also come into play for our Part 3 tutorial. The last and final step is to add our content item.
Next we need to modify the SetSite method so that we can call our setup method and add our content to the screen.
displaySite = (IGoogleDesktopDisplaySite)site;
// Display our content here...
if (displaySite != null)
{
    this.SetFlags(GoogleDesktopDisplayPluginFlags.GDD_PLUGIN_FLAG_NONE,
                GoogleDesktopDisplayContentFlags.GDD_CONTENT_FLAG_HAVE_DETAILS);
  this.GetOurStuff();
}
What we have added is the IF condition and it’s contents. The first thing we do is set the flags on the plug-in to tell it that "Hey we have content here that needs to be displayed". After that we call our GetOurStuff method. If you do not add the flags the content will not be displayed.
Ok it’s now time to compile and test. If you get the following screen that’s good, if not adjust your errors until it compiles. This is what you should see.
Once you click yes open your GDS unless it is already open. You should see something like the screen below.
What we learned
In this part of our tutorial we have walked you through the process of adding content items to your component. You have seen how you can add individual items, remove those items, and the different changes needed in order to add it to your plug-in.
Tutorial – Google Desktop Sidebar – Hello World Part 1, A simple plug-in
Posted on December 10th, 2006
Requirements
.Net Framework SDK 1.1
Google Desktop SDK
Downloads
The zip file listed here is all inclusive of all four tutorial parts. We broke up the article into four parts for ease of reading. Included in the zip is a Word doc version of all four articles.
Purpose
In this article I intend to show you how to build a simple Google Desktop Sidebar (GDS) component. The entire source is in C# 1.1. We assume that all developers looking at this article are familiar with writing code in C# and the .Net framework. For this component we will be doing a simple Hello World type sample. We will show screenshots where appropriate. Otherwise we assume you know your way around.
What it shows
We intend to show you how to hook up a basic no frills .Net C# GDS component. What we have done is setup some basic modules under the folder GoogleBase that you can re-use in any component that you develop. These files wrap up all the API and com interaction that Google had setup in the samples sdk. Now it’s easy for you to use. In the article we will show you how to setup the component. Work with a title changing. Adjusting Layout formats (the canned ones). Adding content items. Using the default reader pane, and setting up Property pages.
This tutorial will walk you through the steps taken to get where the sample code is.
Project Setup
To start with create a new solution with and add a Class Library project. If you have not downloaded the code for this article please do so now as it will have some base files you will need to get going. Also, you need to make sure you have the Google Desktop SDK installed for this to work.
Copy and include the GoogleBase folder and all of it’s contents from the zip file into your project. These modules setup the following, ImageConverter object for getting your resource streams down to COM layer, the COM API, structures, etc needed by the GDK, and the base property page object that you can inherit from in order to create your property pages.
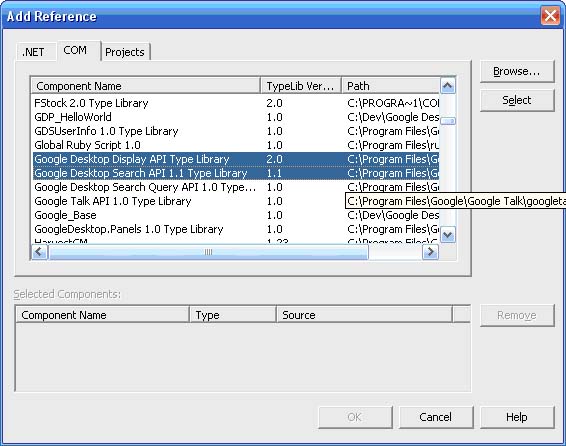
Once you have the files include you need to add some references to your project. The first two references are needed for the plug-in to work. In the references window click on the COM Tab and find the following two objects (figure 1) and add them to your project.
Once you have selected those objects it will create the necessary Interop dll’s needed since we are interacting with COM objects instead of managed code.
You also need to include the following references:
- System.Drawing
- System.Windows.Forms
Once that is done you need to set your project properties. The Google Sidebar is a COM object so we need to build a COM library. To do so we need to enable that in our project properties. So open your project properties and set the basics like Assembly name, root namespace, etc. Once you have that done goto the Configuration Properties -> Build section and at the bottom of your options change the Register for COM Interop to TRUE. This will enable us to build a com library.
That’s the basic setup for the project. Now we need to start putting together the basic plug-in.
Compilation Notes
When building a COM library you will need some registration functions in your code to allow it to hook in properly. We will show that after we get the basic plug-in up and running with a title.
However, once you compile and register your component with the GD Sidebar you cannot modify it unless you exit the Sidebar application. This will remove the hooks so you can re-compile and re-register. Tedious process if you are doing a lot of testing but it works.
Your first plug-in
Ok, lets setup our first plug-in. Create a new Class file in your project and the following includes for the file.
using System;
using System.Text;
using System.Runtime.InteropServices;
using System.Windows.Forms;
using System.IO;

// used for Registry / Com interop registration
using Microsoft.Win32;
using Google.Base;
// Base module to ease plug-in development
using Google.Base.Utils;
// Base module to ease plug-in development
using GoogleDesktopAPILib;
// Google Type libraries
using GoogleDesktopDisplayLib;
// Google Type libraries
Once you have these in let’s create our first plug-in class. For your class, add the following inheritance chain (or cut / paste and change your class name):
public class HelloWorldPlugin : GoogleDesktopDisplayPluginHelperClass, IGoogleDesktopDisplayPluginHandler, ISpecifyPropertyPages, IObjectWithSite, IPersistStreamInit
Once you have the class inheritance model in place use the Class view to go in and implement all the interfaces.
Now let’s setup some of our base internal values that we will use with our com object. These values will be used with the registration and read by the GDS when you view available plug-ins.
// since this is a com object we can store some info as static members.
static string baseTitle = "Hello World";
static string pluginName = "Hello World";
static string pluginDesc = "Hello World sample written in C#";
There is one other item you must add and it is extremely important. All COM objects need a GUID. So let’s add ours. Using the GUIDGEN utility from the framework choose the registry format to generate and take the value and add it to our class in the following ways:
[GuidAttribute("A674FDFF-D816-4eaf-9D5E-97317158733E")]
public class HelloWorldPlugin : GoogleDesktopDisplayPluginHelperClass, IGoogleDesktopDisplayPluginHandler, ISpecifyPropertyPages, IObjectWithSite, IPersistStreamInit
{
  // You must set a control GUID and it must match the guid attribute in order to work static string     controlGuid = "{A674FDFF-D816-4eaf-9D5E-97317158733E}";
}
The GUID’s in both places need to match. Without this you will be unable to register and use your plug-in.
You will also need to add the following member variables to the class:
// Member variables needed to hook into the Sidebar api
// this retrieves the site info for this plug-in.
private IGoogleDesktopDisplaySite displaySite;

// setup the layout options so the sidebar api knows how to render our information.
private GoogleDesktopDisplayContentItemLayout layout;
What this does is allows your app to hook into the panel that is showing your information. You will notice that we set up above a baseTitle object as static. You do not need to do this if you plan to have your title bar be dynamic. However it aids in this demonstration. The layout property will be used in a later tutorial.
Ok, now that we have some member variables, our interfaces implemented (roughly) and a class to use let’s build the constructor. Here we will setup an initial layout format as well as hook in the About box information. Real quick here about the about box. There are three distinct areas that text is put. The first line will use your logo if any and display your main info like a company name. If you use two new line commands it will kick your text down to the main content area.
Here is our constructor:
public HelloWorldPlugin()
{
  // setup some basic info.
  StringBuilder sb = new StringBuilder();
  sb.Append("Hello World Plug-in by CaubleStone Ink");
  sb.Append("//n//n");
  sb.Append("Shows how to setup basic functionality");
  sb.Append("for a sidebar plug-in.//n");
  this.layout = GoogleDesktopDisplayContentItemLayout.GDD_CONTENT_ITEM_LAYOUT_NOWRAP_ITEMS;   this.about_text = sb.ToString();
}
What we have done here is setup our basic info using a StringBuilder and setting our basic layout to just the plain jane no wrap value. Similar to the TODO list from Google.
Now lets walk through setting up the interfaces. By default you can leave all the interfaces alone however you may need to add a few new keywords on some to aid in the code generation and to help avoid memory leaks.
We are going to start with the IObjectWithSite interface class. All we need to do here is add the following so our app can get a handle to the display surface that the GDS will be using.
public void GetPageContainer(out Object site)
{
  // TODO: Add HelloWorldPlugin.GetPageContainer implementation
  site = null;

}

public void SetSite(Object site)
{
  displaySite = (IGoogleDesktopDisplaySite)site;
}
That’s it. We are slowly on our way to a plug-in. Now on to the next interface IGoogleDesktopDisplayPluginHandler. In this interface we will hook up our Title for our plug-in. What we plan on having is the plug-in adjust the title from Hello World to Hello World – Min when it’s minimized or maximized.
public new void OnCommand(GoogleDesktopDisplayPluginCommand command)
{
  if (command == GoogleDesktopDisplayPluginCommand.GDD_CMD_ABOUT_DLG)
  {
    // always throw this exception when you dont intend to override the default behavior
    // and you want the plug-in helper to do it[ES][SQ]s usual stuff.
    throw new NotImplementedException();
  }
}

public new void OnDisplayStateChange(GoogleDesktopDisplayTileDisplayState display_state)
{
  if (display_state == GoogleDesktopDisplayTileDisplayState.GDD_TILE_DISPLAY_STATE_MINIMIZED ||        display_state == GoogleDesktopDisplayTileDisplayState.GDD_TILE_DISPLAY_STATE_RESTORED)
  {
    // switching between minimized and normal mode, so update the title
    this.GetTitle();
  }
}
Notice that we have the new keyword on both of these methods. That is so it hides the underlying implementation (which there is none since it’s an interface) and helps us to prevent memory leaks. What we are doing is checking the value of display_state which comes in from the interface call. If the component has been minimized or restored it will change our title.
Let’s get our GetTitle function in here.
public void GetTitle()
{
  this.title = baseTitle;
  if (displaySite != null && displaySite.display_state ==  GoogleDesktopDisplayTileDisplayState.GDD_TILE_DISPLAY_STATE_MINIMIZED)
  {
    this.title = baseTitle + " - Min";
  }
}
What we are doing here is setting the underlying classes title property. We are starting with our baseTitle static variable and then appending the “- Min” to it if we are minimized.
Now we are finished with our basic code. Let’s get our registration functions in place so we can see the final results.
COM Registration functions
#region Registration functions
/// <summary>
/// Called when the plug-in is registered with the system. We add a few registry
/// keys and register with GoogleDesktop as a plug-in.
/// </summary>
/// <param name="t" /></param>
[ComRegisterFunctionAttribute]
static void RegisterFunction(Type t)
{
  try
  {
    // Set the "MiscStatus" value in registry to a valid value string keyName = @"CLSID\" + t.GUID.ToString("B");

    using (RegistryKey key = Registry.ClassesRoot.OpenSubKey(keyName, true))
    {
      key.CreateSubKey("Control").Close();
      using (RegistryKey subkey = key.CreateSubKey("MiscStatus"))
      {
        subkey.SetValue("", "whateveryouwant");
      }
      key.CreateSubKey("Control").Close();
      key.SetValue("",pluginName);
      using (RegistryKey subkey = key.CreateSubKey("Description"))
      {
        subkey.SetValue("", pluginDesc);
      }
    }

    // Create the registrar object
    GoogleDesktopRegistrarClass registrar = new GoogleDesktopRegistrarClass();

    // Start component registration by specifying our attributes
    object[] descriptions = { "Title", pluginName, "Description", pluginName, "Icon", "" };

    registrar.StartComponentRegistration(controlGuid, descriptions);
    // A single component can register for multiple plugins with Google Desktop.
    // Here we register a single display plug-in.
    IGoogleDesktopRegisterDisplayPlugin displayRegistration =
        (IGoogleDesktopRegisterDisplayPlugin)         registrar.GetRegistrationInterface("GoogleDesktop.DisplayPluginRegistration");

    displayRegistration.RegisterPlugin(controlGuid, false);
    // Done with component registration.
    registrar.FinishComponentRegistration();
  }
  catch (Exception e)
  {
    MessageBox.Show("Exception thrown during registration. Description=" + e.Message);
  }
}

/// <summary>
/// Called when the plug-in is unregistered. We unregister our plug-in with
/// GoogleDesktop.
/// </summary>
/// <param name=""t"" /></param>
[ComUnregisterFunctionAttribute]
static void UnregisterFunction(Type t)
{
  try
  {
    // Create the registrar object
    GoogleDesktopRegistrarClass registrar = new GoogleDesktopRegistrarClass();
    // Unregister ourselves
    registrar.UnregisterComponent(controlGuid);
  }
  catch (Exception e)
  {
    MessageBox.Show("Exception thrown during registration. Description=" + e.Message);
  }
}
#endregion
What this block of code does is writes to the registry values needed to register your component for COM interop. By using the GoogleDesktopRegistarClass it also registers your COM object for use and visibility by the GDK. For the most part you can just copy / paste whenever you build a plug-in.
Compiling and Running
Ok, now that you have all the code in place it’s time to compile and run your application. If your build was successful you should see the following:
Once you get this message hit yes. If you have the Google Sidebar running you should see it show up immediately. If not startup the Sidebar and if not there add the panel.
Based on what we have done you should see something like the following:
Normal
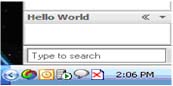
Minimized
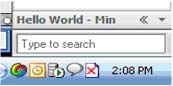
What you are seeing is the Hello World plug-in with only a title. The title will change when you Minimize or Restore the panel.
What you have learned
In this part of our tutorial you have learned the basics of creating a very simple plug-in for the Google Desktop Sidebar using C#. As you can see it only took minimal setup steps thanks to some of the items that Google provided and we broke out for you.
In our next article we will cover adding content items, basic format to the plug-in.
Errata
04-12-2006
Thanks to M. Loeffen for catching this. If you were working through the examples you would indeed recieve a compile error because we did not define the layout property. We have adjusted the tutorial to add this variable to our main plugin class. If you want to see it here this is what you need to add:
  // setup the layout options so the sidebar api knows how to render our information.
  private GoogleDesktopDisplayContentItemLayout layout;